Creating custom Github Actions: A complete tutorial
In this tutorial, we’ll go through the complete process of creating a custom Github Action. We will cover the following steps:
- create repository and metadata for action
- implement action logic and complete code
- publish the action to Github Actions Marketplace
Table Of Contents
What will we build?
In this tutorial, we will build a complete, working Github action. In the previous post about automatic semantic versioning, we’ve seen how we can use it in CI/CD pipelines. As a continuation, we will build upon that knowledge and embed automatic semantic versioning into CI/CD pipeline using Github Actions.
This action will calculate versions in the following way:
- if it’s being run in the context of pull request, it will simply return short commit hash as version (eg.
1234abc) - if it’s run on push to main branch, it will calculate next semantic version based on commit message
Getting started with custom Github Actions
Github Actions can be public or private. You can think of this in the same vein as public or private repositories. Public actions reside in public repositories and can be shared, while private actions are confied to a single repository or organization.
In addition to this, Github Actions can also be separated into three separate categories:
- Docker container actions - entire runtime environment and action code is packaged as Docker container
- JavaScript actions - these are written in JavaScript (or any language that can be transpiled to JavaScript) and run directly on runner machine. They are a bit faster then Docker actions, because there is no need to build a Docker image for it
- Composeite actions - allow you to combine multple workflow steps in a single action
For this tutorial, we’ll build a Docker container action. This will allow us to reuse shell scripts used for versioning which we created in previous post.
Create repository and metadata
The first step in the process is to create a repository that will contain action code. Since this will be a public action, we will use public repository. Actual repository for this action is available as git-auto-semver. Creating a repository is standard Github workflow.
Now we need to specify that this repository contains Github Action. We do this by creating a YAML file called action.yml or action.yaml. This files contains action metadata, as well as description of expected inputs and output. For our action, file is available
here.
We’ll start with the most basic content for this file:
| |
First three lines specify the name of the action, short description and name of the author. Section runs contains two entries:
using- tells us that action uses Docker imageimage- which Docker image will be used. This can be URL of the existing image (like Docker Hub URL). In our case, we want to build the image as a part of the action, so we specifyDockerfilehere. This will cause the action to build the image using supplied Dockerfile.
Creating Dockerfile for the action
Next step in the process is to create a Dockerfile that will be created for the action:
| |
This is pretty basic Dockerfile. We use ubuntu:22.04 as base image, then add some standard labels to help Github identify and manage the image. We then copy required scripts from scripts directory to /usr/bin, so they are availble in OS path. These scripts are available in the
scripts directory in action repository.
We also need to install git command, so it is available in the image. This is done in line 12. Finally, we set container entry point in the last line. Actual contant of this file is what we will create next.
Creating entry point script
Entrypoint is the command which is being run when the container starts. For our purposes, we want the following sequence of events:
- if action is run in pull request, return commit short hash as output
- if action is run after push, first check if push is to main branch. If so, calculate and return next version. Otherwise, just return
Before we can create this script, we need to define expected inputs and output for our action. This is done in action.yml:
| |
Here, we define two inputs:
main_branch- this will be an optional input, with default value ofmainif nothing is specified. This tells our action which branch is considered to be main branchinitial_version- also an optional input with default value of1.0.0. This will be used as initial version, if no tags are specified
Inside Github action, we refer to these inputs as INPUT_<input name> variables, where <input name> is capitalized version of the name. So, for our inputs, we can refer to them as INPUT_MAIN_BRANCH and INPUT_INITIAL_VERSION.
Section outputs defines outputs from the action. Here, we have only one output called version-string. We can refer to this output by this name in subsequent workflow steps.
After we have configured inputs and output, we can create the entrypoint script:
| |
The script will infer event that triggered the action from environment variable GITHUB_EVENT_NAME. If event name is pull_request, it will set the value of VERSION_STRING variable to short commit hash. If event name is push, and affected branch is equal to what we specified as main_branch input, it will calculate next semantic version.
Finally, we need to output resulting version. We do it by writing into special environment variable called GITHUB_OUTPUT.
And, we’re done! This is all that wee need to have a working action. Next, we want ot automate building and versioning of the action itself.
Automate bulding the action
In order to build and test the action, we need to specify regular workflow. This is done with file .github/workflows/build-and-test.yml, available
here.
| |
This workflow will run on the following events:
- a pull request to
mainbranch is craeted or updated - a push is performed to
mainbranch
Step Checkout code will simply checkout the repository. Here, we are most interested in steps Generate version and Print version information.
In Generate version, we run the action itself. Notice the uses: ./ line. It will cause the step to run with action defined with the repository. Output of action run will be available as variable steps.generate-version.outputs.version-string. We print this value in the line 21, using echo ${{ steps.generate-version.outputs.version-string }} command.
The last step Tag version will run only on push event. In this step we create a git tag with the value calculated by the action. Initial value will be 1.0.0, since it is the default version.
Tag created here will be in format v1.0.0. But, in line 28, we create another tag v1. Why do we need this? Well, this tag will always point to the latest version of the action.
Usually, Github Actions are used in workflows as uses: owner/action@v1. This way, each time we modify the action, but stay on same major version, all clients will pick up new update without requiring any change in workflow.
If you now run this workflow in your repository, you should get a tagged version 1.0.0.
Publishing action to Github Action marketplace
After all the hard work, it is now time to release our action into wild by publishing it to Github action marketplace. Before we can do that, we need to address two requirements:
- documentation - action is no good if nobidy knows how to use it. Usually, it is sufficient to includebasic information about the usage i the
READMEfile. At a minimum, it should action description, expected inputs and outputs and example of usage - branding - Github allows us to specify color and icon for the action. This is specified as part is
action.ymlfile
| |
Information about branding can be found here. Only available options are color and icon. Icon must be one of the Feathericons.
Once all of this is complete, it’s time to perform the actual release. To start got to Releases section and click Draft new release button:

Draft a new release in Github
1.0.0) and fill in short description.
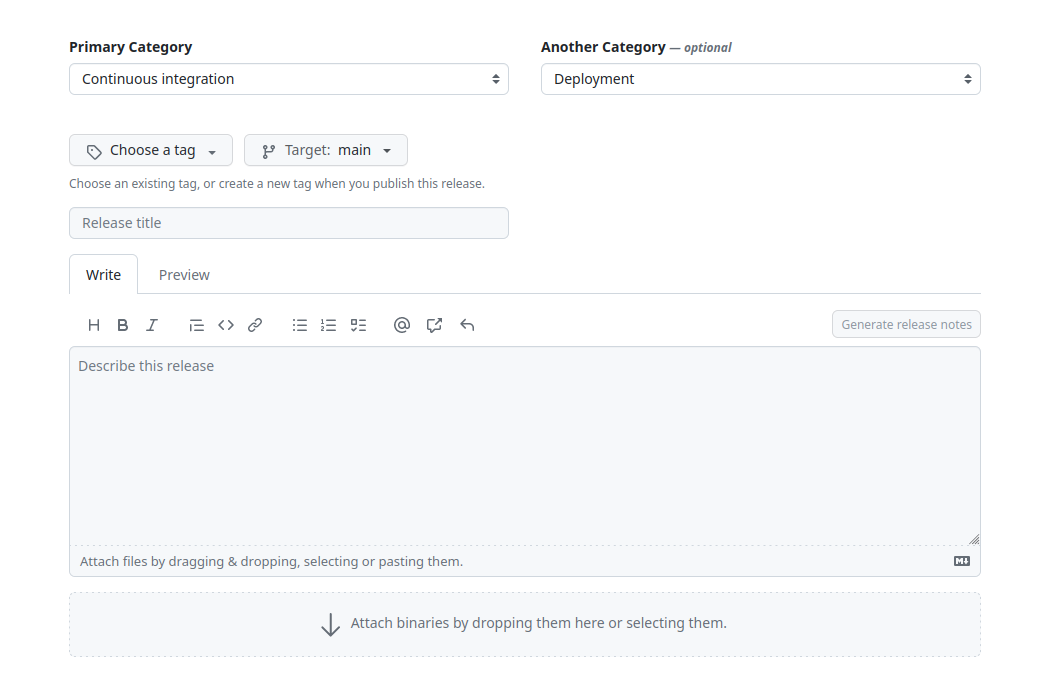
Fill in the information form
And this is it! Once you click the “Publish release” button, your action will be available in the marketplace. You can checkout this action in Github Action marketplace here.
Using the action in workflow
Now that the action is published and available on Github Marketplace, it can be used in other workflows. For real-world usage of this action, checkout the ui-graphics-tools project.
In general, action can be used as follows:
| |
Another example of this action in practice is described in deploying artifacts to Maven Central repository blog post.
Conclusion
I hope you enjoyed this ride! I’m a great fan of automation and code reuse, and creating and publishing actions is a great way to improve both.
If you have any questions or comments, please feel free to post using the form bellow.