Deploy to Maven Central with Github Actions: Step-by-step guide
In this post, we’re going to go over the steps for deploying Java project to Maven Central repository and automate the deployment using Github Action workflow. The whole process of deploying to Maven Central is a kind of convoluted and error prone, so automating it will make your life much easier.
Table Of Contents
What is Maven Central Repository?
Maven Central repository is the main location for downloading dependencies for your Java projects. It is used by most popular Java build tools, ie. Maven and Gradle. Maven Central repository is a default repository for all Java build artifacts. By default, Maven assumes that all dependencies are available in central repository, and that your project will also be deployed to central repository. In essence, central repository is agreed upon location for all Maven artifacts.
Prerequisites for deploying to Maven Central
Maven Central Repository is managed by Sonatype, a software company behind products like Nexus Repository Manager, a widely used repository manager. Sonatype provides nice documentation about deploying artifacts to Maven Central, but as I mentioned, it is quite convoluted and error prone process. Some of the steps can be skipped or altered, depending on the strategy you use for deployment.
Our first order of business is to cover all prerequisites required for deployment to Maven Central.
Verify domain ownership
The first step is to verify the domain you will use as your group ID. In Java, the convention for package names is to start with reverse domain name of your organization. If your organization domain name is myorg.com, packages should start with com.myorg. The same goes for group ID of your artifacts. If your group id will be com.mygroup, you need to prove the ownership of mygroup.com domain.
The way you prove ownership of the domain is to add TXT DNS record to your domain records. Value of this record will be provided by Sonatype.
The first step is to create an account in Sonatype JIRA. Then you need to create a ticket to create new project. In this ticket, you need to request permissions to allow publishing to your requested group ID. You can simply write something like “Please allow publishing artifacts to group com.mygroup”. Administrator will create your requested group ID and configure required permissions.
When you create the issue, take note of issue number. It should be in the form OSSRH-xxxxx. The issue number is the value you need to set for DNS record in order to verify your domain.
Different ISPs provide different GUIs for adding records. Sonatype documentation offers links for most popular provides with instructions on how to add TXT DNS records. For example, this domain is managed by Namecheap, and in their control panel, TXT record settings look like this:

Add DNS TXT record to verify domain ownership
Note the @ character. It denotes the top level domain (in this case bitshifted.co).
After your domain is verified, you should receive an email from Sonatype informing you that your coordinates are ready for publishing. This whole process usually takes a couple of hours, but sometimes might take up to two business days, so be patient.
Prepare signing keys
Maven Central repository requires that all artifacts uploaded to it be signed with GPG keys. This is a security measure to protect against malware and supply chain attacks. To generate signing keys, you can use GnuPG (GPG), an open source and free PGP implementation.
To generate signing key, simply run gpg --gen-key command:
gpg --gen-key
gpg (GnuPG) 2.2.27; Copyright (C) 2021 Free Software Foundation, Inc.
This is free software: you are free to change and redistribute it.
There is NO WARRANTY, to the extent permitted by law.

Note: Use "gpg --full-generate-key" for a full featured key generation dialog.

GnuPG needs to construct a user ID to identify your key.

Real name: test key
Email address: [email protected]
You selected this USER-ID:
    "test key <[email protected]>"

Change (N)ame, (E)mail, or (O)kay/(Q)uit? o
We need to generate a lot of random bytes. It is a good idea to perform
some other action (type on the keyboard, move the mouse, utilize the
disks) during the prime generation; this gives the random number
generator a better chance to gain enough entropy.
We need to generate a lot of random bytes. It is a good idea to perform
some other action (type on the keyboard, move the mouse, utilize the
disks) during the prime generation; this gives the random number
generator a better chance to gain enough entropy.
gpg: key 71989F7DAFC2BDA8 marked as ultimately trusted
gpg: revocation certificate stored as '/home/vlada/.gnupg/openpgp-revocs.d/B3DE555C4D926DC5D55592D371989F7DAFC2BDA8.rev'
public and secret key created and signed.

pub   rsa3072 2023-12-25 [SC] [expires: 2025-12-24]
      B3DE555C4D926DC5D55592D371989F7DAFC2BDA8
uid                      test key <[email protected]>
sub   rsa3072 2023-12-25 [E] [expires: 2025-12-24]
You will need to set a passphrase for added security of the key. Take note or remember this passphrase, because you will need for the signing process. Final few lines of this output show identity of the key it’s fingerprint.
This process generates both private and public key. Next step is to export private key into text format, so they can be used in Github Actions. To export the key, run the following command:
gpg --output private.pgp --armor --export-secret-key [email protected]
This will create file private.pgp with textual representation of the private key.
Configure credentials for Maven Central Repository
Uploading artifacts to Maven Central requires authentication to allow writing artifacts to correct location. These credentials are available in the for of user token from Nexus Repository Manager.
To obtain the crdentials, login to Sonatype Nexus Repository Manager. This is the tool used to manager Maven Central repository. For login, use the same credentials you used to login to JIRA for creating original ticket.
After logging in, go to “Profile” page by clicking on the link in upper right corner:
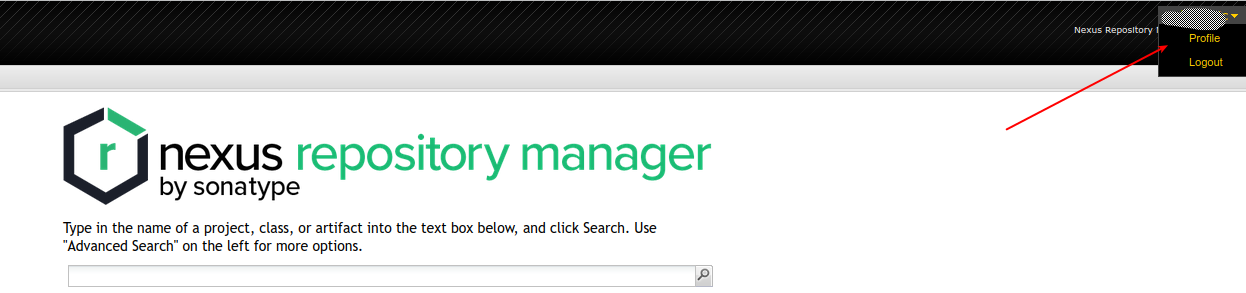
Profile page in Nexus Repository Manager
On profile page, select “User token” from the combo box:
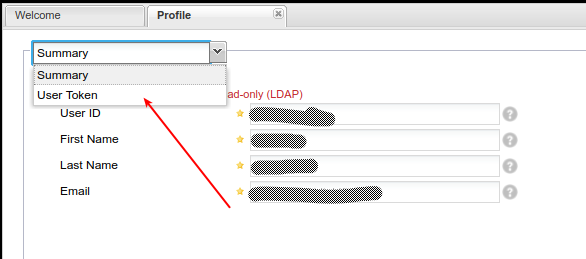
User token settings in Nexus
Finally, on the “User token” page, click the “Access user token” button. The popup window will appear with token information.
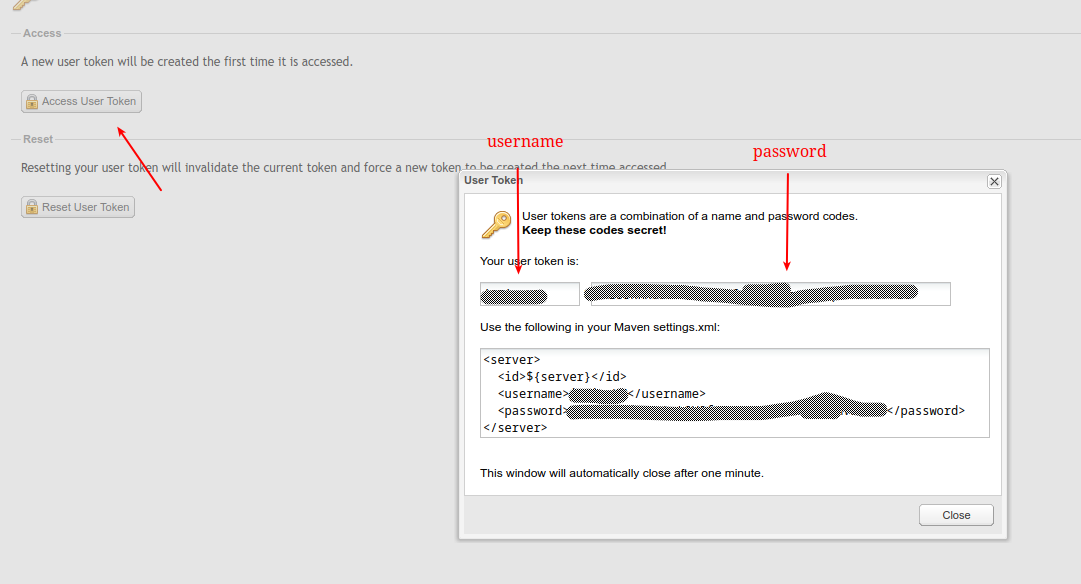
User token configuration
From the popup window information, take note of username and password entries. You will use these as credentials for uploading artifacts to Maven Central.
Configure Maven POM for publishing to Maven Central
With the prerequisites in place, next step is to configure Maven POM for publishing to central repository. Sonatype requires that all projects published in Maven Central contain some mandatory metadata and also to provide sources and Javadoc for the projects.
Required project metadata includes:
- project name, description and URL
- license information
- developer information
- SCM information
As an example of valid POM, you can refer to Reflex REST client project. It is published in Maven Central repository using Github Actions workflow, and I’ll use it here as a sample for deployment process.
For metadata, the following POM configuration is required:
<name>Reflex</name>
<description>Simple and flexible Java REST client</description>
<url>https://github.com/bitshifted/reflex</url>

<licenses>
    <license>
        <name>Mozilla Public License 2.0</name>
        <url>http://mozilla.org/MPL/2.0/</url>
        <distribution>repo</distribution>
    </license>
</licenses>

<developers>
    <developer>
        <name>Vladimir Djurovic</name>
        <organization>Bitshift</organization>
        <organizationUrl>https://bitshifted.co</organizationUrl>
    </developer>
</developers>

<scm>
    <connection>scm:git:[email protected]:bitshifted/reflex.git</connection>
    <developerConnection>scm:git:[email protected]:bitshifted/reflex.git</developerConnection>
    <url>https://github.com/bitshifted/reflex</url>
    <tag>HEAD</tag>
</scm>
This section configures sufficient metadata for publishing your project. Of coursem you will have to adapt these values for your own case.
Since we also need to upload source code and Javadoc, we will have to configure corresponding Maven plugins:
 <plugin>
    <groupId>org.apache.maven.plugins</groupId>
    <artifactId>maven-source-plugin</artifactId>
    <version>2.2.1</version>
    <executions>
        <execution>
            <id>attach-sources</id>
            <goals>
                <goal>jar-no-fork</goal>
            </goals>
        </execution>
    </executions>
</plugin>
<plugin>
    <groupId>org.apache.maven.plugins</groupId>
    <artifactId>maven-javadoc-plugin</artifactId>
    <version>2.9.1</version>
    <executions>
        <execution>
            <id>attach-javadocs</id>
            <goals>
                <goal>jar</goal>
            </goals>
        </execution>
    </executions>
</plugin>
<plugin>
    <groupId>org.apache.maven.plugins</groupId>
    <artifactId>maven-gpg-plugin</artifactId>
    <version>1.5</version>
    <executions>
        <execution>
            <id>sign-artifacts</id>
            <phase>verify</phase>
            <goals>
                <goal>sign</goal>
            </goals>
            <configuration>
                <!-- Prevent gpg from using pinentry programs -->
                <gpgArguments>
                    <arg>--pinentry-mode</arg>
                    <arg>loopback</arg>
                </gpgArguments>
            </configuration>
        </execution>
    </executions>
</plugin>
This code snippet also configures Maven GPG plugin for signing artifacts.
Finally, we need to configure distributionManagement section. This section tells Maven where to upload published artifacts:
<distributionManagement>
        <snapshotRepository>
            <id>maven-central-snapshots</id>
            <url>https://s01.oss.sonatype.org/content/repositories/snapshots</url>
        </snapshotRepository>
        <repository>
            <id>maven-central-release</id>
            <url>https://s01.oss.sonatype.org/content/repositories/releases/</url>
        </repository>
    </distributionManagement>
To set correct URLS, refer to the confirmation email you received after submitting JIRA ticket. It should specify correct server to use for your artifacts.
Configure Github Actions workflow
As stated in the beginning of this post, our goal here is to automate the process of deployment. For Reflex project, each merge to repository main branch should publish new release of the software to Maven Central repository. Versioning of the software will be done automatically using automatic semantic versioning approach. For the automation workflow, will leverage previously created custom Github action to perform automatic versioning.
For a real world example of this approach, we’ll use workflow from Reflex project. You can use it as a reference for this approach.
Customize Maven POM for automatic versioning
The usual way for Maven projects is to specify version fiels in POM with SNAPSHOT suffix, ie 1.2.3-SNAPSHOT. During release process, this version string gets updated by truncating SNAPSHOT suffix and creating stable version. It is also possible to override value of new version when run interactively.
Unfortunatelly, this approach will not work for our automatic versioning approach. We need a way to dynamically specify version during deployment. For that, we can use special property called revision. This is how configuration works:
<version>${revision}</version>
.....
<properties>
   <revision>0.0.0-SNAPSHOT</revision>
</properties>
Here we set default value to 0.0.0-SNAPSHOT. This will be used for local development, so you can refer to artifact during development cycle.
When running the deployment, we will specify the revision value on the command line:
mvn -Drevision=1.2.3 install
Configure secrets and variables for Github Actions
In the prerequisites step, we created some secrets like signing key and user token. Now we need to configura our Github Actions workflow to use these secrets, as well as some environment variables. The values we need to add:
- signing key and passphrase
- user token, ie. username and password
- name for PGP signing key
To set the secrets, you need to go to “Settings” page in your repository, and then in the left-hand navigation pane, go to “Security” section, then “Secrets and variables -> Actions”. Use the “New Repository Secret” button to add secrets. The following screenshot show the secrets you need to add.
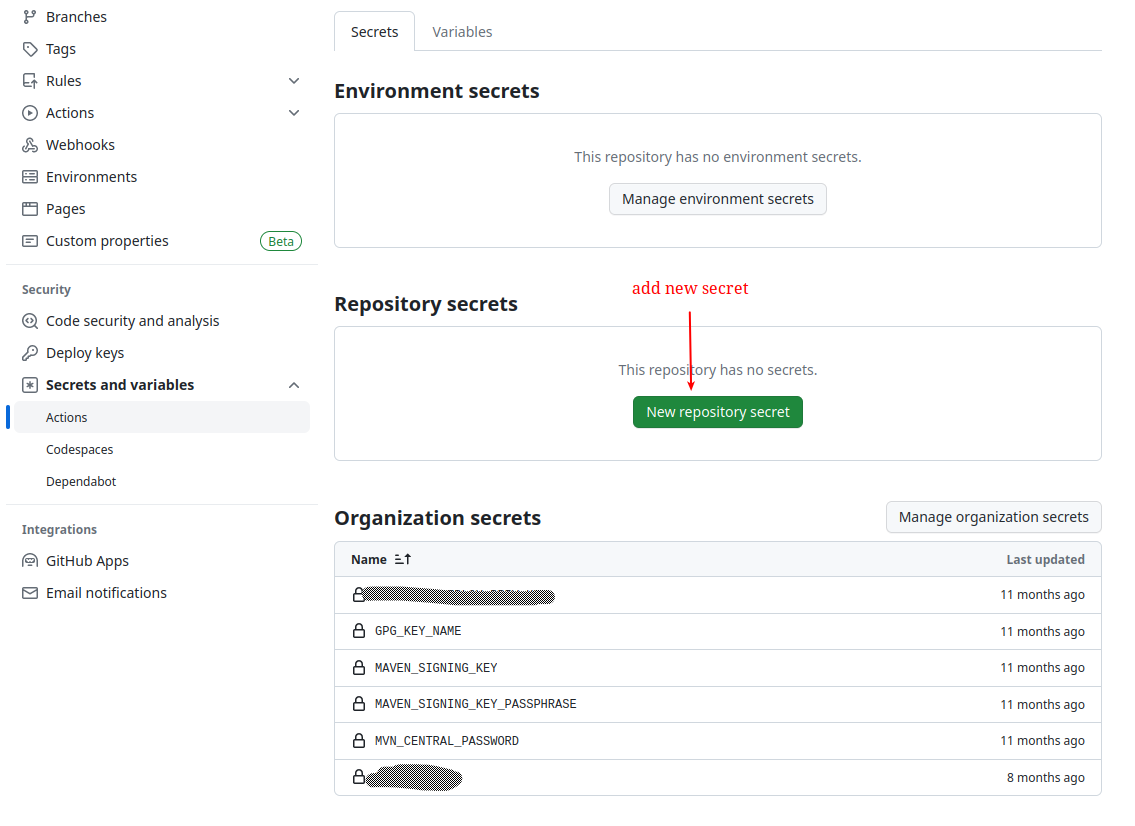
Github secrets required for deployment
Secrets should have the following values:
GPG_KEY_NAME- name being used to reference signing keyMAVEN_SIGNGING_KEY- exported value of PGP key that we created in prerequisites stepMAVEN_SIGNING_KEY_PASSPHRASE- key passphraseMVN_CENTRAL_PASSWORD- password from user access token obtained from Nexus
Create Github Action workflow
Now that we have all requirements in place, it’s time to create the workflow for Github Action. The following code snippet shows the configuration for deploying to Maven Central:
| |
This workflow performs the following steps:
- checks out source code from the repository
- imports generate signing key from secrets we created
- install required JDK and configure credentials for publishing to Maven Central. Credentials are extracted from environment variables initialized from secrets we created
- calculates version for deployment
- perform actual deployment to central repository
Conclusion
Now you have the working pipeline for deploying artifacts to Maven Central repository. It is automated and can be easily adapted to be used in different projects.
I hope you find it useful and would line to get some feedback. If you have any thoughts or comments, please share them using the foem bellow.