PayPal Checkout Integration with AWS serverless
In one of the previous articles, we’ve learned how to integrate PayPal Checkout with Spring Boot application. This time, we will implement the same integration with AWS serverless application based on AWS API Gateway, Lambda function and DynamoDB.
For in-depth understanding of PayPal checkout workflow, please read the linked post, since it contains the detailed explanation.
We’ll reuse much of the code created for Spring Boot integration. For reference, complete integration code is available in Github repo.
Table Of Contents
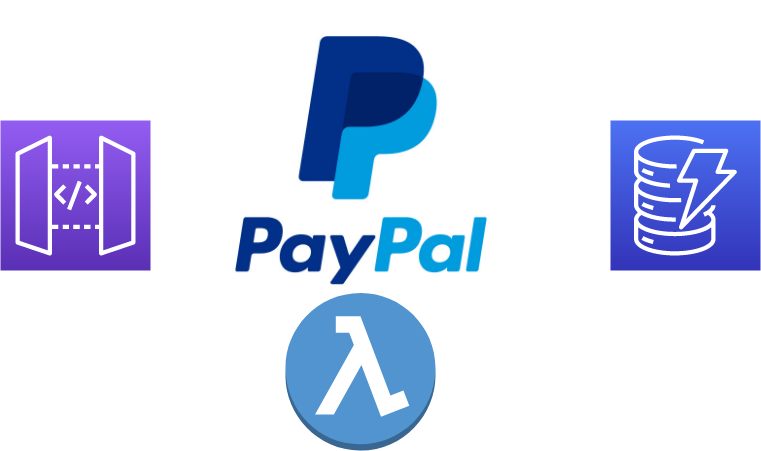
Application architecture
For this example, we will use very simple architecture consisting of API Gateway, Lambda function and Dynamo DB. This architecture is shown in the image bellow:

Serverless application architecture for itnegration
There are 3 main parts of this architecture:
API Gateway - this is the entry point for client requests for our application. It receives HTTP requests and forwards them to Lambda function for processing
Lambda function - contains the business logic of the application. It will manage the integration with PayPal Checkout workflow by creating order, redirecting user and handling confirmation.
DynamoDB - persists information about the orders created by users. In the previous post, we used relational DB, but since this is serverless architecture, DynamoDB is more suitable choice
Creating AWS infrastructure
Before we dive into the code, we need a way to test our application. We need to create required resources in AWS, so we can use them for testing. You will need AWS account for this.
We can create all resources using AWS console, but we will instead use Infrastructure as Code (IaC) approach. This is widely accepted best practice for creating and managing infrastructure, because it has several benefits:
reproducible - you can always create exactly the same resources in automated way
versionable - you can keep it all in version control system, and rollback to required version when needed
Manageable - you can delete all resources with single operation without leaving anything behind. This is very important to save costs.
AWS provides CloudFormation as native IaC tool for creating infrastructure. The downside is that it can be really verbose and tedious to use, because it is based on JSON or YAML files. Instead, we will be using AWS CDK (Cloud Development Kit).
CDK is a tool from AWS which enables you to write IaC in a language of your choice. It supports TypeScript, JavaScript, Python, Java and C#. We will be using TypeScript for this example.
Initialize CDK application
The first step is to initialize CDK application. We can create a cdk folder inside project directory which will contain infrastructure code. In this folder, we will initialize the application:
mkdir cdk
cd cdk
cdk init app --language typescript
This will create a skeleton application which we will customize for our needs.
Create DynamoDB transactions table
The first step is to create a DynamoDB table which we will use to store order information. This code should be added to lib/cdk-stack.ts file:
 // create transactions table
 const txTable = new dynamodb.Table(this, 'TxTable', {
    partitionKey: {
     name: 'paypalTxId',
     type: dynamodb.AttributeType.STRING},
    billingMode: dynamodb.BillingMode.PAY_PER_REQUEST,
    removalPolicy: RemovalPolicy.DESTROY
 })
This code define a table with name TxTable. For partition key, we set the name paypalTxId. This will be the ID returned from PayPal API.
Field billingMode, we will use on-demand billing. This will minimize cost, since we only pay for the requests made, which is good for testing.
Finally, removalPolicy says that table will be deleted when we delete the CloudFormation stack. This is also a way to save cost, since you will not have dangling resource after you finish with testing.
Create Lambda function
The next step is to create Lambda function which will contain business logic. The following code creates the function:
const appId = new CfnParameter(this, 'appId', {
    type: 'String'
})

const appSecret = new CfnParameter(this, 'appSecret', {
    type: 'String'
})

 const lambdaFn =  new lambda.Function(this, 'checkout-function', {
    runtime: lambda.Runtime.JAVA_11,
    handler: 'co.bitshifted.sample.CheckoutHandler',
   code: lambda.Code.fromAsset(path.join('../target', 'paypal-checkout-serverless-1.0-SNAPSHOT.jar')),
   environment: {
      "PAYPAL_BASE_URL": "https://api-m.sandbox.paypal.com",
      "PAYPAL_APP_ID": appId.valueAsString,
      "PAYPAL_SECRET": appSecret.valueAsString
    },
    memorySize: 256,
    timeout: Duration.minutes(1)
})
txTable.grantReadWriteData(lambdaFn)
We will first create parameters appId and appSecret. These are two parameters which will hold PayPal application credentials.
For the function itself, we configure it to use Java 11 runtime and set a handler class. Code will be fetched from Java build target directory, and it is the shaded JAR file which contains all the dependencies.
We also define some environment variables which will hold PayPal credentials and configuration. We can access these variables from the function at runtime.
Function is configured to have a timeout of 1 minute and use 256MB of RAM.
Finally, we grant the function a permission to read and write data from DynamoDB.
Important note: Storing sensitive data in environment variables like this is a HUGE security risk. We only do it here to simplify things. In real world scenario, sensitive information should be stored in Secrets Manager or SSM Parameter Store.
Create API Gateway REST API
The final piece of our infrastructure is API Gateway. It will contain the REST API which our clients can use to connect. CDK code to create the API:
const checkoutApi = new api.RestApi(this, 'checkout-api', {
    deployOptions: {
      stageName : 'dev'
    }
})

const checkout = checkoutApi.root.addResource('checkout')
  checkout.addMethod('POST', new api.LambdaIntegration(lambdaFn, {
  proxy: true
}))

const checkoutSuccess = checkout.addResource('success')
  checkoutSuccess.addMethod('GET', new api.LambdaIntegration(lambdaFn, {
  proxy: true
}))
Our API will be called checkout-api. It will have single stage called dev. Stage is similar to the context root in Java web application, meaning all requests will have a format /dev/some/path.
Next, we create two resources, /checkout and /checkout/success. These are configured as Lambda proxy integration resources.
Deploy infrastructure to AWS
With our infrastructure defined, we need to deploy it to AWS. CDK provides a convenient tools for deployment. The following code is used for deployment:
export CDK_DEFAULT_REGION=eu-central-1
export CDK_DEFAULT_ACCOUNT=xxxxxxx
cdk synth
cdk deploy --parameters appId=<paypal app id> --parameters appSecret=<appsecret>
We first define two environment variables which CDK needs for deployment.
Command cdk synth generates CloudFormation template in JSON format. Finally, we deploy it using cdk deploy command. Here, we need to specify values for parameters we defined, otherwise deployment will fail.
Running this code will create CloudFormation stack containing all defined resources. As an output in console, you will the base URL of API gateway, which we will use for testing. This is shown in the image bellow:
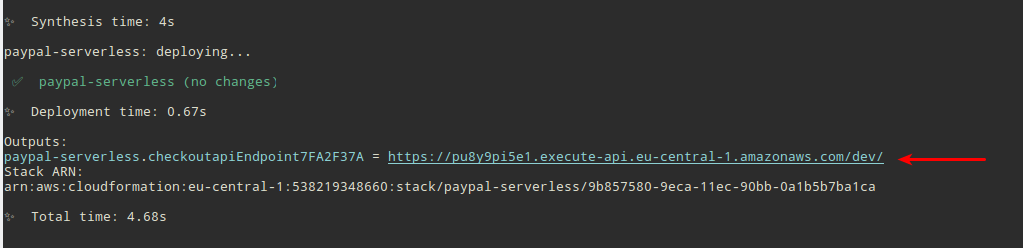
API Gateway base URL for testing
Important note: Make sure to delete the stack when you finish with testing. Keeping it running may incur additional costs.
Lambda function code
Lambda function contains our business logic, and in this section we’ll see how it will be implemented.
There are two pieces of logic we need to implement: one is to determine the type of request received based on API Gateway event and the other is actual payment.
With Lambda proxy integration, API gateway invokes Lambda with an event which contains all the data from the request, like path, headers, payload, parameters etc. The first piece of puzzle is implementing Java class to represent this request. This is our ApiGatewayEvent class:
@Data
@JsonIgnoreProperties(ignoreUnknown = true)
public class ApiGatewayEvent {
    private String httpMethod;
    private String path;
    private String body;
    private Map<String, String> queryStringParameters;
}
This class contains the data we need for this exercise. Complete API Gateway event contains much more information, but we don’t need it for now. If you are interested, you can see complete example of API Gateway event here.
API Gateway expects a response from Lambda in a specific format. This is represented by class ApiGatewayResponse:
@Data
@Builder
public class ApiGatewayResponse {
    private int statusCode;
    private Map<String, String> headers = new HashMap<>();
    private String body;
}
Response contains HTTP status code, optional headers and body as string.
Create Lambda handler
Lambda handler is the entry point for application, comparable to main function in traditional application. Before we start coding, we need to add dependencies for working with Lambda and DynamoDB. We need to add the following in POM file:
<dependencyManagement>
    <dependencies>
      <dependency>
        <groupId>software.amazon.awssdk</groupId>
        <artifactId>bom</artifactId>
        <version>2.17.123</version>
        <type>pom</type>
        <scope>import</scope>
      </dependency>
    </dependencies>
  </dependencyManagement>
.....
<dependencies>
<dependency>
  <groupId>com.amazonaws</groupId>
  <artifactId>aws-lambda-java-core</artifactId>
  <version>1.1.0</version>
 </dependency>
 <dependency>
   <groupId>software.amazon.awssdk</groupId>
   <artifactId>dynamodb</artifactId>
 </dependency>
</dependencies>
This will pull all the dependencies we need for Lambda function implementation and to work with DynamoDB.
Our CheckoutHandler will look like this:
public class CheckoutHandler implements RequestHandler<ApiGatewayEvent, ApiGatewayResponse> {
    @Override
    public ApiGatewayResponse handleRequest(ApiGatewayEvent event, Context context) {
        var mapper = new ObjectMapper();
        var config = new PaypalConfig();
        config.setBaseUrl(System.getenv("PAYPAL_BASE_URL"));
        config.setClientId(System.getenv("PAYPAL_APP_ID"));
        config.setSecret(System.getenv("PAYPAL_SECRET"));
    }


     private boolean isCreateOrderRequest(ApiGatewayEvent event) {
        return "POST".equalsIgnoreCase(event.getHttpMethod()) &&
            "/checkout".equalsIgnoreCase(event.getPath());
    }

    private boolean isOrderSuccessRequest(ApiGatewayEvent event) {
        return "GET".equalsIgnoreCase(event.getHttpMethod()) &&
            "/checkout/success".equalsIgnoreCase(event.getPath());
    }

}
Handler takes API gateway event as input, and it returns a response. Two private methods determine what type of request is received, based on event data.
We care about two requests: the first is checkout, which creates a PayPal order, and the other is payment confirmation.
At the start of handleRequest method, we first setup PayPal configuration. We use environment variables we configured in CDK template.
Processing checkout request
PayPal checkout process begins by client submitting a checkout request. In our setup, client will send HTTP POST request to /checkout API endpoint. In response, Lambda created a HTTP client that creates an order using PayPal API. This whole process is described in detail in post about PayPal integration with Spring Boot application.
In our Lambda handler, we need to perform the following actions:
Determine the type of incoming request. If it is checkout request, then proceed. For this, we use
isCreateOrderRequest()methodInvoke PayPal API to create order
If order creation is successful, store the info in DynamoDB
The code for this is given bellow. Not the line where we set the return URL. This is API Gateway endpoint where user will be redirected after payment is approved.
if(isCreateOrderRequqest(event)) {
    var client = new PayPalHttpClient(config, new ObjectMapper());

    var appContext = new PayPalAppContextDTO();
    appContext.setReturnUrl("https://pu8y9pi5e1.execute-api.eu-central-1.amazonaws.com/dev/checkout/success");
    appContext.setBrandName("My brand");
    appContext.setLandingPage(PaymentLandingPage.BILLING);

    var order = mapper.readValue(event.getBody(), OrderDTO.class);
    order.setApplicationContext(appContext);
    var orderResponse = client.createOrder(order);
    // write to DynamoDB
    var dbClient = DynamoDbClient.builder().region(Region.EU_CENTRAL_1).build();
    var itemMap = new HashMap<String, AttributeValue>();
    itemMap.put("paypalTxId", AttributeValue.builder().s(orderResponse.getId()).build());
    itemMap.put("status", AttributeValue.builder().s(orderResponse.getStatus().toString()).build());
    itemMap.put("timestamp", AttributeValue.builder().s(ZonedDateTime.now(ZoneId.of("UTC")).format(DateTimeFormatter.ISO_DATE_TIME)).build());
    System.out.println("Item map: " + itemMap);
    var putRequest = PutItemRequest.builder()
        .tableName("TxTable")
        .item(itemMap)
        .build();
    dbClient.putItem(putRequest);
    System.out.println("Successfully created order");
    return ApiGatewayResponse.builder().statusCode(200)
        .body(mapper.writeValueAsString(orderResponse))
        .build();
}
Code for creating order is the same as for Spring Boot integration. The difference here is that we store order data in DynamoDB. Stored item will have 3 attributes:
paypalTxId- this is partition key. It contains order ID returned by PayPalstatus- PayPal order status. It will bePENDINGuntil customer approves the paymenttimestamp- when the order was created
We construct DynamoDB item with these fields and finally store it using PUT operation.
The final step in this flow is to return response to API Gateway. The response body will be the response we get from PayPal API. It contains the URL to which we should redirect the user to approve the payment.
Processing order confirmation
After user approves the payment in PayPal, he is redirected to the endpoint /checkout/success. This endpoint will change order status in DynamoDB and notify user of the successful payment. The code does the following here:
else if(isOrderSuccessRequest(event)) {
    var token = event.getQueryStringParameters().get("token");
    // update order status
    var key = new HashMap<String, AttributeValue>();
    key.put("paypalTxId", AttributeValue.builder().s(token).build());

    var updateValues = new HashMap<String, AttributeValueUpdate>();
    updateValues.put("status", AttributeValueUpdate.builder().value(
        AttributeValue.builder().s(OrderStatus.COMPLETED.toString()).build()).build());
    updateValues.put("timestamp", AttributeValueUpdate.builder().value(
        AttributeValue.builder().s(ZonedDateTime.now(ZoneId.of("UTC")).format(DateTimeFormatter.ISO_DATE_TIME)).build()).build());

    var dbClient = DynamoDbClient.builder().region(Region.EU_CENTRAL_1).build();
    var request = UpdateItemRequest.builder()
        .tableName("TxTable")
            .key(key)
                .attributeUpdates(updateValues)
                    .build();
    dbClient.updateItem(request);

    return ApiGatewayResponse.builder()
        .statusCode(200)
        .body("{\"status\": \"success\"}")
        .build();
}
check if this is order success request by examining API gateway event
extracts
tokenquery string parameter, which contains PayPal order IDIt uses this token as a key to update the status of the order in database
finally, it sends the response to API Gateway that order is successfully updated
Testing complete workflow
You can use Postman to test the flow. The following steps are needed:
Send a HTTP POST request to /checkout endpoint with the following payload (don’t forget to prefix it with stage, ie. /dev):
{
  "intent": "CAPTURE",
  "purchase_units": [
    {
      "amount": {
        "currency_code": "USD",
        "value": "100.00"
      }
    }
  ]
}
You should get a response with several links. One with "rel": "approve" is the URL which you need to visit to approve the order:
{
  "id": "XXXXXX",
  "status": "CREATED",
  "links": [
    {
      "href": "https://api-m.paypal.com/v2/checkout/orders/XXXXXX",
      "rel": "self",
      "method": "GET"
    },
    {
      "href": "https://www.paypal.com/checkoutnow?token=XXXXXX",
      "rel": "approve",
      "method": "GET"
    },
    {
      "href": "https://api-m.paypal.com/v2/checkout/orders/XXXXXX",
      "rel": "update",
      "method": "PATCH"
    },
    {
      "href": "https://api-m.paypal.com/v2/checkout/orders/5O190127TN364715T/capture",
      "rel": "capture",
      "method": "POST"
    }
  ]
}
This screenshot shows how this looks in Postman:

Order response from PayPal (notice the approve URL)
After you approve the payment, you will be redirected to checkout success page, where you should get the final order confirmation:
{"status": "success"}
Final thoughts
That’s it, we’ve finally integrated PayPal checkout with AWS serverless application. In this post, I skipped much of the details which we covered in previous post about integration with Spring Boot. In any case, you can see the complete source code in Github.
If you have any questions or doubts about this, please don’t hesitate to ask. Just send a comment using a form bellow.